How to Blink an LED Using Arduino
This project is the "Hello World!" of Arduino, the best place to start your journey into creating projects. In this project, we are going to learn about physical outputs and two electronic components, while performing the most straightforward project in the electronics sea of projects.
1.0 Hardware Required
- Arduino Board
- LED
- 220Ω Resistor
- Breadboard
- Jumper wires
2.0 Background Knowledge
2.1 Series Circuits
In this project, components are connected in a series configuration. A series circuit provides only one path for current between two points so that the current is the same through each series component. [1] If you would like to know more about series circuits, check out our blog.
2.2 Light Emitting diode - LED
A light-emitting diode (LED) is a semiconductor light source that emits light when current flows through it. [2] An LED is commonly used across a wide range of applications and is a perfect tool to manipulate on your projects. You can get them in multiple colours; in the example below, we used a red LED.
2.3 Resistor
A resistor is a passive two-terminal electrical component that implements electrical resistance as a circuit element. In electronic circuits, resistors are used to reduce current flow, adjust signal levels, to divide voltages, bias active elements, and terminate transmission lines, among other uses. [3] To know more about resistance and how resistors work, check out our blog.
2.4 Breadboard
The breadboard is a simple device and is one of the most essential components for DIY electronics, especially for beginners, that will enable you to build and test circuits. It will help you get familiarised with electrical circuits and has a wide range of use. It has multiple holes where LED lights, resistors, cables and integrated circuits can be inserted. The picture below demonstrates how the connections in a breadboard are made.

Figure 1: Internal connection of a breadboard
The horizontal lines are used to power the board, where as the vertical green lines are used to build a circuit. Any two points on any of the lines are connected. Note that all the vertical holes, A to E or F to J, are connected. All our starter kits comes with a breadboard.
2.5 Arduino Board
Arduino is an open-source electronics platform based on easy-to-use hardware and software. Arduino boards are able to read inputs - light on a sensor, a finger on a button, or a Twitter message - and turn it into an output - activating a motor, turning on an LED, publishing something online. You can tell your board what to do by sending a set of instructions to the microcontroller on the board. To do so you use the Arduino programming language (based on Wiring), and the Arduino Software (IDE), based on Processing.[5]
3.0 Circuit
To build the physical circuit for this project follow figure 2. Note that an Arduino Uno has been used in this circuit. However, any Arduino can be used.
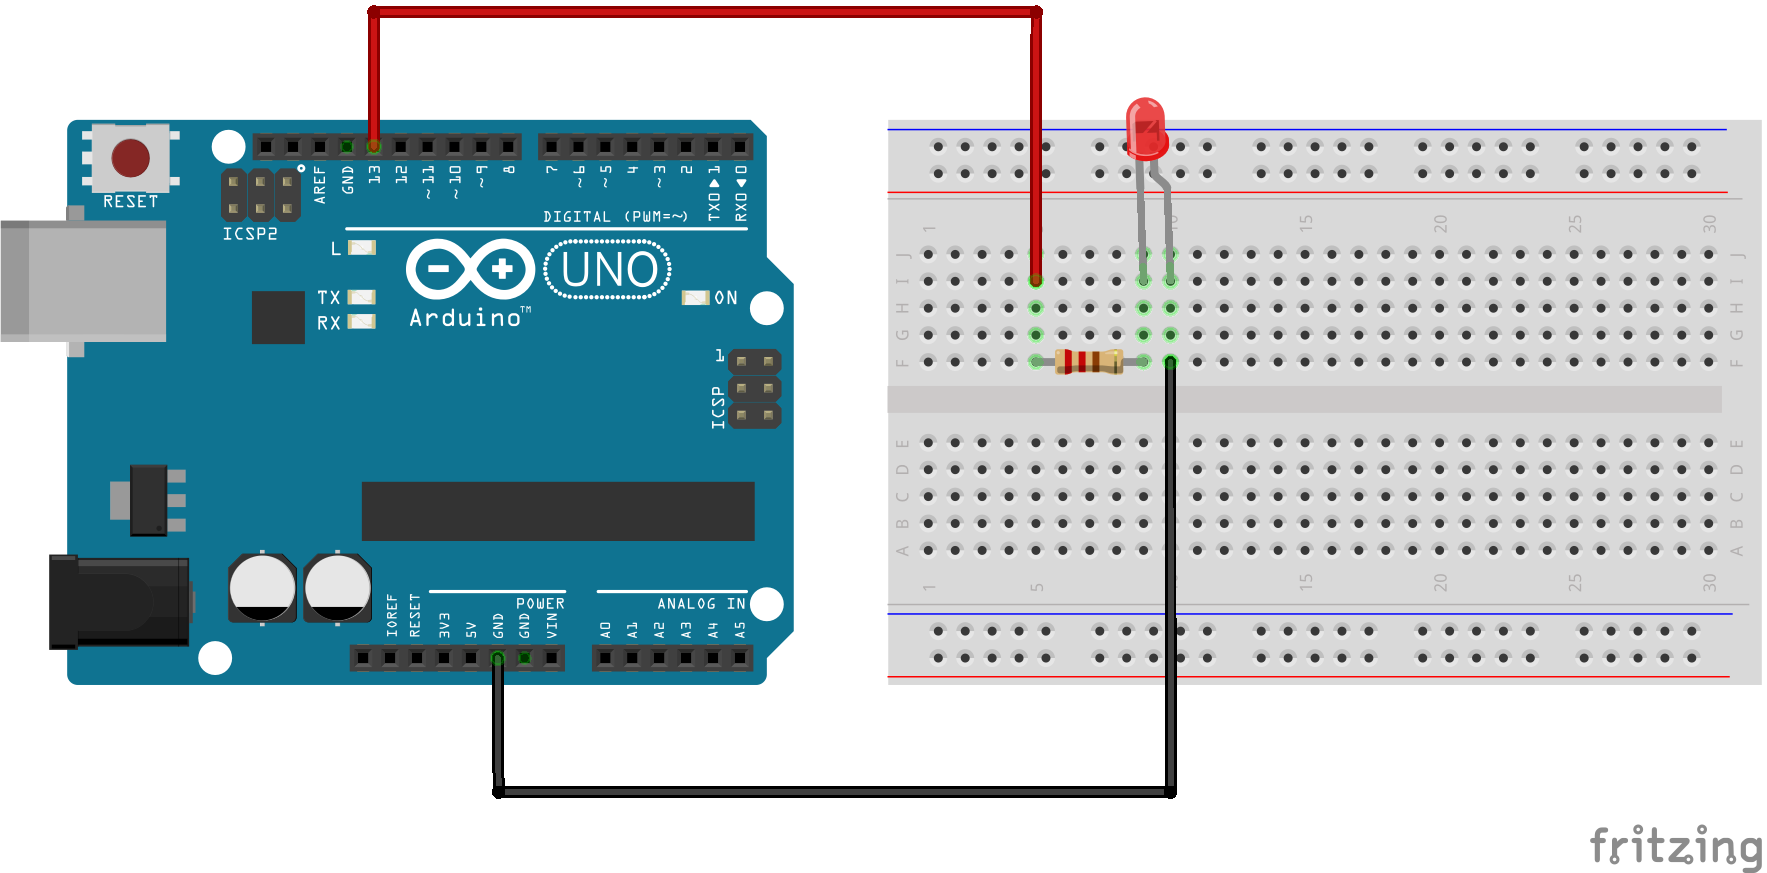
Figure 2: Circuit for blinking LED
- Please resistor and LED on the breadboard.
- Using a wire, connect one leg of the resistor to digital pin 13 of the Arduino in a series connection, just like in figure 2.
- Connect another leg of the resistor to the long leg of the LED (the positive leg, called anode).
- Using a separate wire, connect the short leg of the LED (the negative leg, called cathode) to the ground (called GND) [4] in the Arduino board.
4.0 Schematic

Figure 3: Blink Schematic
5.0 Code
To write your code, you would need to download the Arduino IDE software, which you can download for free from the Arduino website, or you can drop us a message and we can send you a link.
After you build the circuit plug your Arduino board into your computer, start the Arduino Software (IDE) and enter the code below. [4]
After the code is written, verify the code using the verify  button on the top left corner of your screen. Once verified, upload the code onto the board using the upload
  button and see the LED blink!
You can also play around with the frequency of how often you would like the LED to blink by changing the delay in the code. Every 1000(ms) is equal to 1 second. Try the blinking program with different variations for yourself! Happy programming!
7.0 References
[1] T. L. Floyd, Principles of Electric Circuits, New Jersey: Pearson Education, Inc, 2010.
[2] "Light-emitting diode," wikipedia, [Online]. Available: https://en.wikipedia.org/wiki/Light-emitting_diode. [Accessed 20 05 2019].
[3] "Resistor," wikipedia, [Online]. Available: https://en.wikipedia.org/wiki/Resistor. [Accessed 20 05 2019].
[4] SM, "Blink," Arduino CC, 28 07 2015. [Online]. Available: https://www.arduino.cc/en/Tutorial/Blink. [Accessed 20 05 2019].
[5] Arduino, “Arduino Website,” Arduino, February 2018. [Online]. Available: https://www.arduino.cc/en/Guide/Introduction. [Accessed 07 March 2022].