How to Read Temperature with the LM35DZ Sensor and Arduino
The LM35DZ is a three-pin temperature sensor that outputs a voltage scaling linearly with temperature in Celsius. In this beginner-friendly guide, we'll connect LM35DZ to an Arduino and write the few lines of code needed to turn its output into a real temperature reading. Plus, touch on the accuracy caveat most tutorials skip.
Introduction
Temperature is one of the easiest real-world signals to bring into an Arduino project, and the LM35DZ is one of the simplest sensors to start with. It needs no calibration, no lookup table, and no extra modules, just three wires and a single analog pin. In this guide, we'll wire up the LM35DZ and write the few lines of code needed to turn its output into a real temperature reading.
Background Knowledge
What Is the LM35DZ?
The LM35 series is a family of precision temperature sensors, originally developed by National Semiconductor and now manufactured by Texas Instruments. Unlike a thermistor, which outputs a resistance you have to convert with a non-linear formula, the LM35 outputs a voltage that scales directly and linearly with temperature in Celsius.
The "DZ" in LM35DZ tells you what you're holding: "D" is the accuracy grade, and "Z" means it's housed in the small, three-pin TO-92 package, the same case style used for transistors like the 2N3904. That's the version included in most beginner electronics kits, including ours.
How It Works
Every LM35 outputs 10 millivolts for every 1°C of temperature, with 0 mV corresponding to 0°C. If the sensor outputs 250 mV, the temperature is 25°C. There's no offset to subtract and no chart to consult, just divide the voltage by 10.
Know Your Grade
Most LM35 tutorials online quote a headline accuracy of ±0.5°C, but that figure applies to the higher-cost LM35A grade, not the D grade used in the LM35DZ. The D grade trades some precision and the full −55°C-to-150°C range for a lower price, and is officially rated from 0°C to 100°C (32°F to 212°F) [1]. In practice: don't expect to measure a freezer or a campfire with this sensor, and expect everyday readings to land within roughly a degree or two of the actual temperature.
At a Glance
| Parameter | Value |
|---|---|
| Manufacturer | Texas Instruments (originally National Semiconductor) |
| Package | TO-92, 3-pin |
| Output | Linear analog voltage, 10 mV per °C |
| Calibrated range (D grade) | 0°C to 100°C (32°F to 212°F) |
| Supply voltage | 4 V to 30 V (Arduino's 5 V rail works fine) |
| Current draw | Less than 60 µA |
| Self-heating | About 0.08°C in still air |
Hardware Required
To wire up the LM35DZ, you will need the following components:
- An Arduino Uno, Nano, or similar 5 V board
- LM35DZ temperature sensor
- Breadboard
- Three jumper wires
- Optional: a 0.1 µF ceramic capacitor, recommended for longer wire runs
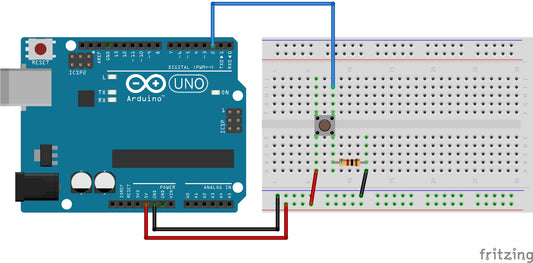
Circuit

The LM35DZ has three pins. Hold the sensor with the flat, printed face toward you and the pins pointing down; from left to right they are +Vs, Vout, and GND.
Step 1: Connect +Vs to the Arduino's 5V pin.
Step 2: Connect GND to any Arduino GND pin.
Step 3: Connect Vout to analog pin A0.
Step 4 (optional, recommended): Bridge a 0.1 µF ceramic capacitor between Vout and GND, placed as close to the sensor's legs as possible. This filters electrical noise that can otherwise make readings jump around, especially over longer wires.

Code
Step 5: Program the Arduino. Open the Arduino IDE, create a new sketch, and copy the following code:
const int sensorPin = A0;

    void setup() {
      Serial.begin(9600);
    }

    void loop() {
      int reading = analogRead(sensorPin);

      float voltage_mV = reading * (5000.0 / 1024.0);
      float temperatureC = voltage_mV / 10.0;

      Serial.print("Temperature: ");
      Serial.print(temperatureC);
      Serial.println(" C");

      delay(1000);
    }
The math has two steps: first convert the raw 0 to 1023 ADC reading into a voltage, then divide that voltage by 10, because the sensor outputs 10 mV per degree (lines 10 to 11 in the code block above):
float voltage_mV = reading * (5000.0 / 1024.0);
float temperatureC = voltage_mV / 10.0;
Step 6: Upload the Program to the Arduino. Open the Serial Monitor (Tools > Serial Monitor, or Ctrl+Shift+M) and set the baud rate to 9600. A new temperature reading prints once per second. (A full guide to uploading code to Arduino is planned as its own reference post, see the Blog Register.)
Getting Reliable Readings
- Give it a moment: the sensor has some thermal mass, so it takes a few seconds to settle after a temperature change.
- Keep it away from heat sources on the breadboard, such as motor drivers or voltage regulators.
- Add the 0.1 µF capacitor mentioned above if your readings look noisy or jump around.
- Remember the 0 to 100°C range: this D-grade sensor isn't rated for sub-zero readings.
Project Ideas to Try Next
- Pair it with a Four Channel 5V 3A Relay Shield to switch on a fan once temperature crosses a threshold. (Write-up planned, see the Blog Register.)
- Show live readings on a 4-Bit Digital Tube LED Display instead of the Serial Monitor.
- Log readings over time to spot daily temperature patterns in a room, greenhouse, or incubator.
Conclusion
The LM35DZ is about as forgiving a sensor as you'll find for a first analog-input project: three wires, one formula, and a real-world reading on the screen. Once you're comfortable with the wiring and the analogRead()-to-temperature conversion shown here, the same pattern applies directly to almost every other analog sensor you'll use in future projects.
References
[1] Texas Instruments, "LM35 Precision Centigrade Temperature Sensors," SNIS159H.